Creating our adult Astrid and Hiccup cosplays was such a fun follow-up project after making the kids’ versions! I was able to repurpose most of the props from my niece’s Astrid costume – including the battle axe, skirt, and armbands – and just scaled up a few essentials like the shoulder armor and headband to fit an adult size. It was a perfect blend of recycling and reimagining, giving the pieces a second life while keeping that authentic How to Train Your Dragon Viking style. Pairing it with Scott’s Hiccup look made the whole cosplay duo come together perfectly – two dragon riders ready for adventure at the St. Louis Renaissance Festival.
To see more on the kids cosplay guide: Astrid Cosplay – How to Train Your Dragon Viking Costume Build
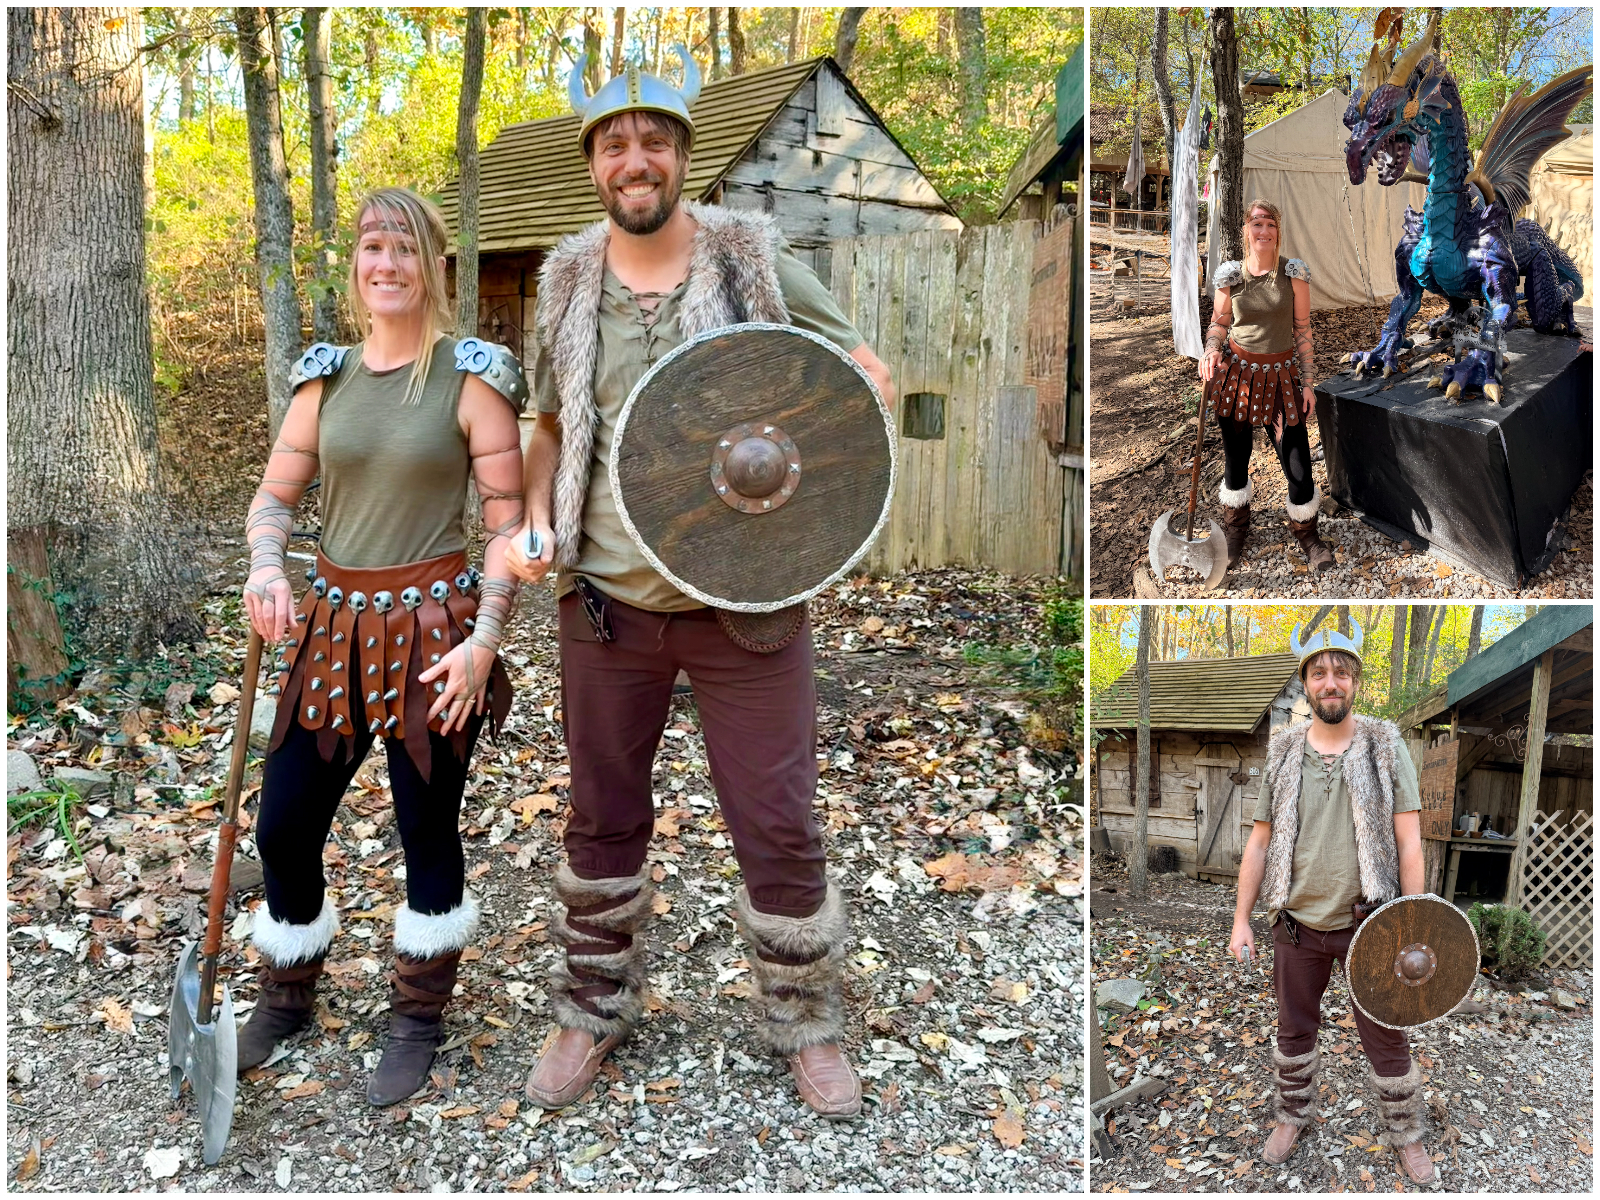
St. Louis Renaissance Festival
We debuted our adult Astrid and Hiccup cosplays at the St. Louis Renaissance Festival alongside our niece and nephew, who proudly wore the original kids’ versions we made. My nephew was Toothless this time, while my brother joined in as a Viking and my niece added her own flair as a “super cat” for Heroes and Villains weekend. Surrounded by knights, dragons, and medieval music, our little group fit right in. The mix of faux leather, fur, and 3D-printed armor looked perfectly at home among the blacksmiths and Viking vendors, and we even got a few “Hey, Astrid!” shouts from fellow fans. It truly felt like we’d stepped straight out of Berk and into a real-life festival full of dragons.
Astrid Scale Up
Wearing my Astrid cosplay at the St. Louis Renaissance Festival was such a blast! The setting felt like it was made for her – rustic wooden booths, Viking horns dangling everywhere, and plenty of curious festival-goers stopping to admire the armor and battle axe. For the adult version, I customized the original kid design, keeping most of the same 3D-printed pieces but scaling up key parts like the shoulder armor, headband, and skirt to fit an adult size. The combination of faux leather, fur accents, and detailed 3D prints looked perfectly at home among the blacksmiths and warriors roaming the village, making it feel like Astrid had truly come to life.


Skirt
The original skirt I made for my niece was designed with some extra room to make it reusable for different sizes – perfect for adapting to an adult version later.


Below is a step-by-step summary with dimensions (watch the video for visuals).
🪡 Measure & Cut Leather Skirt
- Lay out faux leather fabric and measure:
- Waist Width – Adult: 34”, Kid: 22”
- Strip Width – 2″ wide for a total of 17 strips for adult and 11 for kid.
- Strip Length – 15″ total: 10” long with 5” extra at top for folding
- Cut 2” wide strips x 10″ length, leaving strips connected at the top 5″ edge and rounding the bottoms
🎨 Paint & Prep Details
- 3D print skulls and spikes in black PLA
- Adult: 16 skulls, 34 large spikes, 34 small spikes
- Kid: 12 skulls, 22 large spikes, 22 small spikes
- Lightly paint parts with silver acrylic, allowing some black to remain for aged look
📏 Detail Layout on Leather Skirt
- Lay all strips flat and measure / mark placement of each part.
- Start spikes 1.5” from the bottom of each strip.
- Add 2 large spikes on the bottom and 2 smaller spikes on top.
- Keep 2” spacing between spike sets.
- Position each skull ~0.5” from the top slit.
🔩 Attach Details to Leather Skirt
- Secure spikes and skulls with small screws through the leather.
🪡 Measure & Cut Jagged Inner Skirt
- Lay out brown faux suede fabric and measure:
- Waist Width – Adult: ~34”, Kid: ~22”
- Strip Width – 2″ wide for a total of 18 strips for adult and 12 for kid.
- Strip Length – 18″ total: 13” long with ~5” extra at top for folding
- Cut 2” wide strips x 13″ length, leaving strips connected at the top 5″ edge and pointing the bottoms to make it jagged
🧵 Attaching Skirts & Fitting
- With the wrong side up, lay the jagged inner skirt on top of the faux leather skirt.
- Fold over top edge and glue down with fabric glue.
- Add fabric glue to edges of jagged skirt edges to prevent fraying.
- Add Velcro closure on both sides for an adjustable fit (adult: ~30″ waist, kid: ~20” waist).
💪 Shoulder Armor
The shoulder armor was fully 3D printed and painted to capture Astrid’s signature Viking look –rugged and ready for dragon battles. The build process was exactly the same as the kid’s version, just scaled up to 150% for an adult fit. I also added velcro to the underside to attach to the shoulders of the shirt to help stabilize the larger armor. I found a green heather shirt at Goodwill, cut off the sleeves, and sewed Velcro pieces onto the shoulders to attach the armor. Below is the original build video, which shows every step from 3D printing to painting – same techniques, just a bigger Viking this time!


👩 Headband, Armbands, and Other Pieces
The armbands were easy since they’re one-size-fits-all – just with a little less wrap when worn by an adult. The kid-sized headband could’ve technically worked by extending the elastic, but I decided to remake it for a cleaner finish since the back would be visible. Like the original design, I used the same faux leather and 3D-printed rivets, just adjusted the circumference to fit an adult (~23″). You can see the full headband and armband build process in the original video. I tried to pull off a four-strand braid but quickly admitted defeat, so I stuck with a classic three-strand braid secured with black elastics –it still gave off the perfect Viking vibe. For the bottom, I paired black leggings with an old pair of gray boots that I painted brown and wrapped with fur leg covers from a caveman costume in our closet – true Viking recycling at its finest!


⛏️ Battle Axe
Here’s the 3D printing and finishing process for the original Astrid’s Battle Axe that I made for my niece, and works great for Astrids of all sizes!
Hiccup
Hiccup’s costume came together surprisingly easily with a mix of pieces from our costume stash and a few quick purchases. The hardest part wasn’t the outfit – it was convincing Scott to let me straighten his hair so he’d look more like Hiccup. A few passes with the flat iron and some light teasing (of both his hair and his patience) later, he was ready to ride off with Toothless.


Hiccup Pieces
- Green renaissance shirt: purchased from Amazon
- Brown renaissance pants: purchased from Amazon and already in our costume collection
- Fur jacket: purchased from Goodwill
- Fur leg covers: generic viking costume in our collection
- Hiccup’s dagger: 3D printed
- Viking shield: William Wallace cosplay
- Viking helmet: 3D printed 3 different sizes of this viking helmet (see video below of all our 3D printed viking helmets)


No Comments