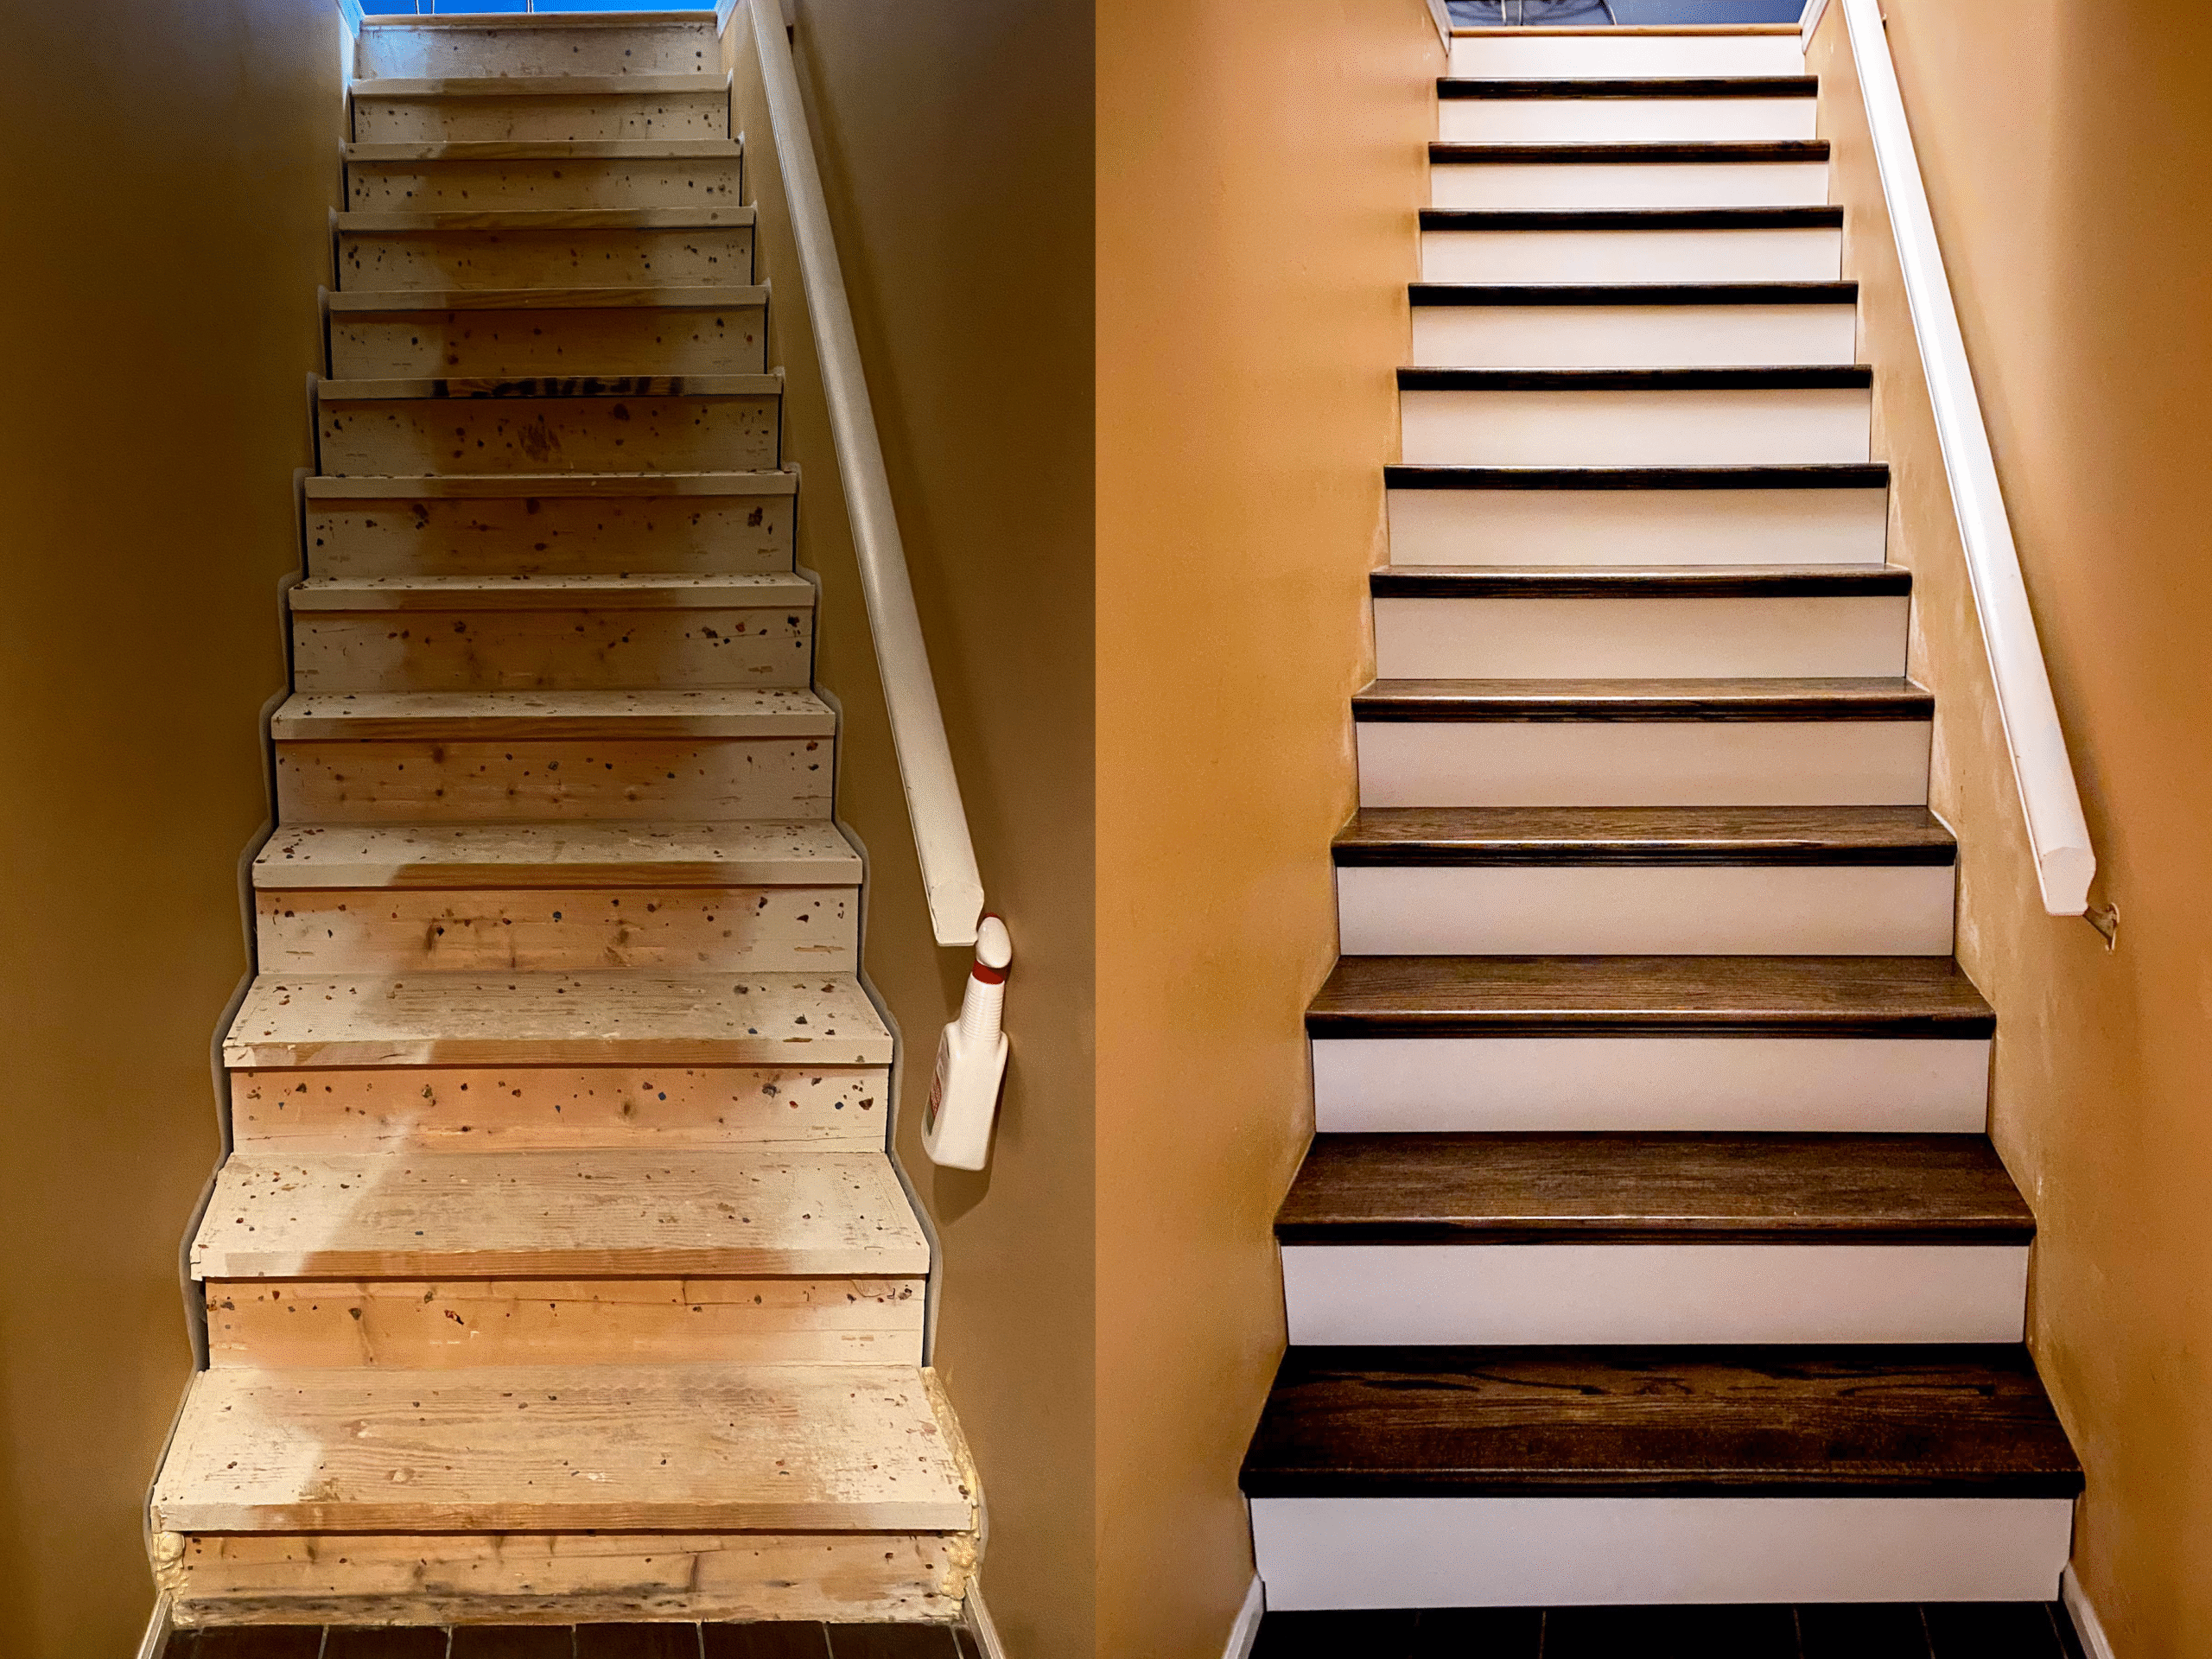
We’ve been wanting to replace our carpeted stairs with hardwood, and Frodo helped motivate us by peeing on the carpet! With the social distancing, we couldn’t find anyone that would be able to complete this upgrade for us in a reasonable time so we decided to do it ourselves! We are definitely newbies at this, so we had to do a lot of research and troubleshooting to pull this one off. All the hard work paid off, and we now have beautiful oak wood stairs 🙂
The first big step was deciding on design and materials. We currently have bamboo flooring in our house, but it hasn’t held up well so we opted for oak wood. I really liked the dark stair with the white backer, and thought this would transition well to our basement with dark brown tile. We opted for RetroTread and RetroRiser sold at Lowes. We used these two sources and my dad for guidance: RetroTread Installation and Extreme How To.
Materials
- 13 – RetroTread 11.5-in x 42-in Unfinished Red Oak Stair Tread (1 extra in case we messed one up)
- 13 – RetroRiser Stairparts 7.5-in x 42-in Primed Poplar Stair Riser
- 1 – Minwax Wood Finish Satin Jacobean Oil-based Interior Stain (32-fl oz)
- 1 – Minwax 32-fl oz Satin Oil-Based Polyurethane
- 7 – LOCTITE Pl Premium Brown Multi-Purpose Construction Adhesive (10-fl oz) (Rule of Thumb is 1 tube per 2 steps so we bought one extra to be safe)
- Mineral spirits (for cleaning brushes, wiping off residue, and diluting polyurethane)
- #6 x 1-5/8″ trim screws or 16 gauge finishing nails (for securing treads we opted for screws since none of them would be showing & they’d prevent squeaking)
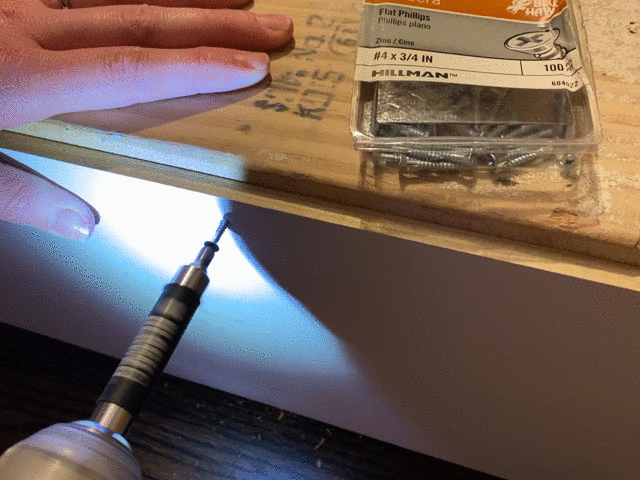
- #4 x 3/4″ screws (for securing risers)
- Lumber or scrap wood to fill gap between riser & existing overhang (if applicable)
Equipment
- Sander and Sanding Pads (I love my Black & Decker mouse sander!)
- Table saw (we borrowed one from a friend)
- Miter saw (a sliding compound miter saw is preferable, but we made do with a basic one)
- Stair tread gauge (I made one because I didn’t want to spend $100 on this)
- Drill (we had two which was helpful for pre-drilling)
- Jigsaw (if required for cutting out pieces of riser to fit along top/bottom step)
- Needle nose pliers
- Flat head screw driver
- Natural Bristle Paint Brush
- Mallet
- Measuring tape
- Pencil/Marker
Materials cost us around $600. We had to borrow a table saw from a friend.
Method
1. Remove Carpet, Padding, and Staples
Pull up all the old carpet, padding, and staples. This was the biggest pain and took forever (especially since carpet has been installed twice in our house so there were two types of staples). Needle nose pliers and a flat head screw driver are super helpful for this. I also rough sanded each step to ensure they were smooth (this is optional depending on the condition of your stairs).


2. Measure Steps & Purchase Materials
First, measure your step dimensions including length, riser height, tread depth, and overhang. Create a rough drawing with the dimensions for easier visualization (all the dimensions varied quite a bit). We have 12 steps that are ~39″ length with ~10.5″ treads and ~6″ risers. The distance between the existing riser and the overhang varied quite a bit, and made it tricky to fill that gap. We purchased materials per the list above. It was a tight squeeze to fit everything in my CR-V. 😉


3. Test Stain Color
I wanted dark steps so I tested both 1 and 2 coats, and liked 2 coats best. Be sure to follow the stain instructions, and wipe off the stain in between coats.


4. Cut Stair Treads and Risers
The biggest thing we didn’t want to do was cut off the existing overhang/bullnose from our steps. We don’t have a circular saw, and it looked like a huge job to cut them all off. Multiple sources said you could just fill in the gap, which is what we decided to do.
We also struggled a bit with knowing what step construction codes were for our area, and the requirements for tread depth and riser height. Some sources said a min tread depth of 9″ and others 10″ so opted to play it safe and ensure our steps had 10-11″ treads. Anything over 11″ actually doesn’t require a bullnose, but our RetroTreads had it built in, which was good because our steps turned out to be about 10.5″. Sources varied for riser heights, but all fell between 4-7″ limits so we opted to go somewhere in the middle of the range at ~6″.
First, cut the white risers down to required height (6.75-7″)with the table saw. We opted to put the riser on top of the treads to avoid cutting the treads & allow a little gap between the tread and back board for temperature fluctuation. The tread bullnose covers the top of the riser where we cut so we didn’t have to be super precise with these.
Then using a tread gauge (I made mine out of insulation foam in about 10 minutes using foam scraps leftover from my iron throne project), mark the treads and risers with the lengths (ours were roughly 39″ but they varied quite a bit). Be sure to number the back of your treads/risers to match the the stair number (note I wrote the stair number on the back of the existing riser). With a miter saw, cut the treads/risers. Sand the ends to clean up cuts. Dry fit them all into place, and make adjustments as needed. Be sure to work from the bottom up since the riser has to be installed after the tread (we initially started at the top because we thought we were going to put the risers behind the tread).


For the bottom and top steps, we had to use a jig saw to cut out slivers on the riser to allow room for the existing trim.
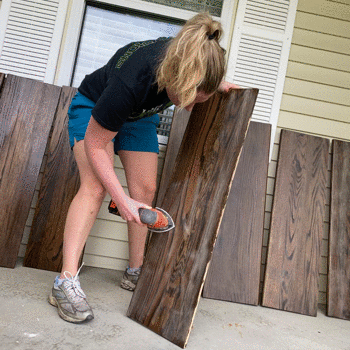
5. Stain Stair Treads
Be sure to follow the instructions on the stain container. First, lightly sand (220 grit) all the boards to round any rough edges, smooth out the surfaces, and enhance stain absorption. Then wipe them all down to remove dust. Apply stain and let set for max time (15 minutes) for darkest color. Wipe off any excess, and allow to dry the recommended time before applying another coat (min 4 hrs – we waited overnight for ~20 hrs). Repeat staining process for second coat. After fully drying (min 8 hrs – we waited overnight for ~20 hrs), lightly sand all boards with fine sandpaper (220 grit). Remove residual dust and stain with mineral spirits (confirming stain is dry and there’s no bleeding).


During sanding, I did notice a little “bleeding”, which I later discovered can happen with oak and required additional dry time. We did this project in our garage and temperatures fluctuated between 40-70 F so drying times were quite a bit longer than the recommended times (even though we’d given them extra overnight drying time). If you do see any bleeding, I’d highly recommend letting it dry longer before applying polyurethane (I had actually already started the first coat and wish I could have waited).
6. Apply Polyurethane to Treads
I struggled a bit with bubbles, which I was worried about and did some research. I ended up implementing all of these tips from my searches to help prevent bubbles:
- Very smooth and dry surface preparation (i.e. stain fully dried, properly sanded, and all dust/residual stain removed) I learned the hard way on this one with the stain “bleeding”
- Use a natural bristle for oil-based polyurethane (which is what we’d bought)
- Stir polyurethane very slowly when mixing
- Soak the brush in mineral spirits before using, and gently wipe off excess on paper
- Apply very thin coats, brushing on very slowly and don’t wipe brush on can
- If required, dilute polyurethane with mineral spirits (10-50%) in a separate container (I diluted my first 3 and final coats to 25% or 3:1 ratio polyurethane to mineral spirits)
Be sure to follow the instructions on the polyurethane container. Just before starting, wipe with a tack/microfiber rag to ensure no particulates have settled. Apply a thin coat of polyurethane and allow to dry for recommended time (3-4 hrs). I had issues with stain “bleeding” out on the first day so I wiped with mineral spirits to remove any of this. I actually opted to wait overnight after each coat (~16-24 hrs) before the additional coats to ensure no additional bleeding and that each coat fully dried due to my lower garage temps.
After drying, lightly sand all boards with fine sandpaper (220 grit), and wipe off all dust using mineral spirits.
Repeat application for at least two additional coats (3 total recommended for hardwood floors – I did 5 since I diluted my polyurethane & needed to fix some bubbles/imperfections). Allow to cure at least 24 hours before installation or use.


7. Cut Boards to Fill Gap between Riser
We bought some 2-in x 6-in x 10-ft Fir Lumber (Common); 1.5-in x 5.5-in x 10-ft (Actual) thinking we’d fill in the entire gap between the current step overhang. Unfortunately, these ended up being too thick so we just cut 2 small pieces per stair from these boards to provide support behind the risers (you can use any scrap wood, which needs to be cut to be flush with the existing overhang).
Screw these into the existing riser, ensuring they leave enough gap below to fit the stair tread. Alternatively, you can just set these directly on top of the tread later when you install these (we did this for a few we had to replace to fit more flush). Ensure that the board is exactly flush with the existing overhang; otherwise, the riser will bow in on the corners at the bottom and the stair tread may not hit the minimum 10″. We learned the hard way and had to recut quite a few of these. This step could be done earlier, but we opted to wait to do this while the stain and polyurethane were drying.


8. Install Treads and Risers
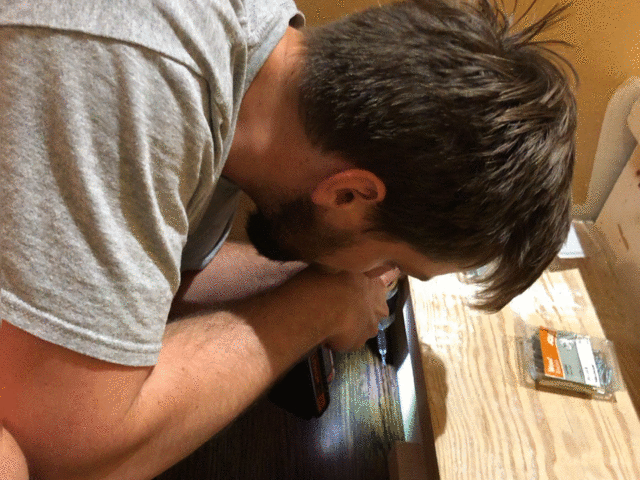
Working from bottom of the steps, apply adhesive to existing step in zig-zag pattern. Insert tread, tap in tightly with mallet, pre-drill holes (we just did 3 along the back), and secure with trim screws. We opted for trim screws because they reduce squeaking, and we didn’t have a finishing nail gun (also none of the ones would be visible so we wouldn’t have to worry about them showing).
Insert riser, tap in tightly with mallet (ensure flush with boards inserted to fill gap), pre-drill holes (we just did 3 along the top), and secure with screws. We opted for shorter #4 x 3/4″ screws on these since they were such thin boards. There wasn’t a way to insert the riser on the top step without the screws showing so we opted to just glue this one on a custom-cut piece of scrap wood that fit perfectly.


All the hard work paid off with some very beautiful stairs that match well with the basement tile! The cats really like the new stairs too!


No Comments